
Chapter 15 : Core Concepts Of Mysql With Python
इससे पहले दिए गए Chapter मे केवल Basic Mysql को Explain किया गया है क्योंकि केवल basic Mysql Database Create के लिए काफी नही है यानि आपके लिए Basic Mysql से Project Database Create करपाना कठिन होगा , इसलिए आपको Mysql से संबंधित कोई Problem न हो इस Purpose से इस Chapter को add किया गया है | इस Chapter मे MySql Commands , MySql Connection With Python जैसे Mysql के महत्वपूर्ण Topics Add किए गए है |
Python के साथ Mysql का उपयोग करने के लिए नीचे दिए गए steps को follow किया जाता है |
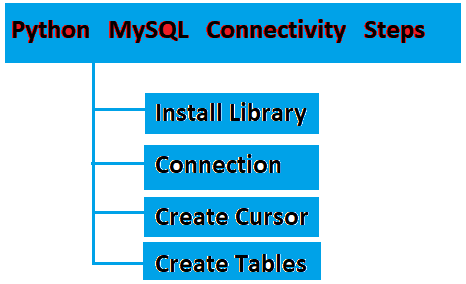
1. Install Library
Install Library Python के साथ Mysql का उपयोग करने का पहला और basic step है | इस step मे Mysql की python मे library install की जाती है | mysql-connector-python Library Python language के लिए बनाई गई है | इस library के उपयोग से mysql को Python के अलावा किसी दूसरी languages के साथ connect नही किया जा सकता है | ये library open source है | mysql-connector library का उपयोग करने के लिए इस library को अलग से pip की सहायता से install किया जाता है मतलब ये library python के साथ नही आती है |
How To Install mysql-connector-python Library
Step 1. सबसे पहले cmd open करे |
Step 2. pip install mysql-connector-python CMD मे दि गई command run कर Mysql library को install करे |
Step 3. अब enter करते ही library install होना शुरू हो जाएगी |
library के install होने के बाद cmd को close कर दे | आप इस library को cmd के अलावा Python के terminal से भी
install कर
सकते है | उसके लिए भी same steps है | बस cmd की जगह python terminal open करे |
ये library क्या करती है ?
1. mysql-connector-python library Mysql को Python के साथ connect करती है |2. Python को Mysql queries/code run करने देती है |
3. app , web etc. के data को Mysql मे store करने देती है |
4. Mysql data को Python programs मे लाने देती है |
Mysql workbench
mysql workbench MySQL की official GUI tool है जिसका उपयोग database create करने , update करने etc. के लिए किया जाता है | Python से table की form मे data को store करने के बाद data को table की form मे देखने के लिए mysql workbench का उपयोग किया जाएगा | mysql workbench को install करने लिए नीचे दिए गए steps को follow करे |
How To Install Mysql workbench
1. mysql की official websites https://dev.mysql.com/downloads/workbench/ से mysql workbench को install
करे |
2. download होने के बाद .msi या .exe file खोलें |Installation wizard open होगा
Next → Typical → Next → Install
3. launch करे |
4. अब mysql workbench को mysql से connect करे |
5. Open Workbench “+” symbol पर क्लिक करें
6. Connection का नाम डालें (जैसे Localhost)
7. Hostname: localhost करे/fill करे |
8. name: root रहने दे |
9. Password अपना एक strong डालें |
2. connection
Mysql library को install कर लेने के बाद python को Mysql से connect किया जाता है | mysql का उपयोग करने के लिए ये step बहुत महात्वपूर्ण भूमिका निभाता है क्योंकि इन steps मे mistake करने पर mysql python से connect नही हो पाएगा | mysql को python से connect करने के लिए नीचे दिए गए code का उपयोग किया जाता है |
  import mysql.connector

  con = mysql.connector.connect(
      host="localhost",
      username="root",
      password="1234",
      database="student"
  )
Code Explanation
import mysql.connector उपर जो mysql library install की गई है | उस library को
को python file मे import करने के लिए import mysql.connector लिखा गया है |
con = mysql.connector.connect( con से connection बनाया जा रहा है | जो details
लिखी गई है | वो बता रही है कि किस तरह से connect करना होगा |
host="localhost", मतलब mysql कहा पर install है |
username="root" mysql का name
password="1234" ये mysql का password है |
database="student" mysql मे student database पर काम किया जा रहा है |
NOTE : इस connection मे बस अपने password को ही change करे | बाकी code मे change न करे | कैसा database
create करना
उसके according database choose करे | जैसे hospital
3. Cursor
Cursor एक pointer होता है जिसका उपयोग mysql की queries को execute करने के लिए किया
जाता है , यानि python mysql से directly बात नही कर सकता है इसलिए cursor mysql और
python को आपस मे जोडता है |
Python से mysql की insert , update , delete etc. commands को execute करने के लिए cursor का उपयोग किया
जाता है | Python मे cursor एक object का काम करता है , यानि cursor के बीना लिखे गए code का कोई महत्व
नही होता | cursor को बनाने का code नीचे दिया गया है : -
con = mysql.connector.connect(
    host="localhost",
    उपयोगr="root",
    password="1234",
    database="school"
)

cur = con.cursor()
Code Explanation
cursor को बनाने से पहले Python और mysql के बीच connection बनाया जाता है |
import mysql.connector = > उपर जो mysql library install की गई है उस library को
को python file मे import करने के लिए import mysql.connector लिखा गया है |
con = mysql.connector.connect( = > con से connection बनाया जा रहा है | जो details
लिखी गई है | वो बता रही है कि किस तरह से connect करना होगा |
host="localhost", = > मतलब mysql कहा पर install है |
उपयोगr="root" mysql का उपयोगrname
password="1234" = > ये mysql का password है |
database="student" = > mysql मे student database पर काम किया जा रहा है |
cur = con.cursor() = > con.cursor() से एक cur नाम का cursor बनाया गया है |
4. Table Create
mysql मे data table की form मे store किया जाता है लेकिन table की form मे data को store करने से पहले mysql मे table के Structure को समझना जरूरी है | नीचे एक image की सहायता से table के part को समझया गया है |
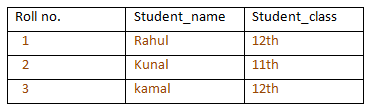
Attributes : mysql मे table के columns को attribute कहा जाता है |
attributes ये बताते है कि table मे किस तरह का data store किया जाएगा | ऊपर दी गई table मे Roll no. ,
student_name
और student_class etc. table के attributes है | किसी table मे data उसके attributes के according
ही store किया जाता है | यदि किसी table मे stored data table के attributes के according नही है | तो
उस table मे stored data का कोई meaning नही होता है |
Tupple : table की एक पूरी row को Tupple कहा जाता है | ऊपर दी गई table मे
1 , Rahul , 12th table की Tupple है | Tupple मे attributes के according values store की जाती है |
Field : Row + Column का intersection होती है | ऊपर दी गई table मे 1 (id का field) ,
Ram (name का field) ,
20 (age का field) है |
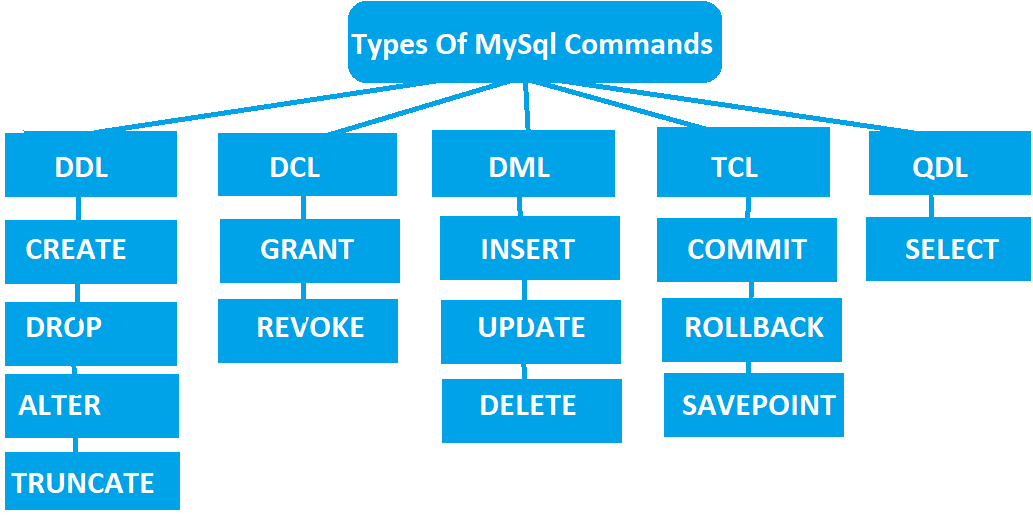
1. CREATE Command
आपको पता ही है कि mysql मे data को table की form मे store किया जाता है | create command mysql की सबसे पहली , basic और Important command है | क्योंकि Create command के उपयोग से table को create किया जाता है | जिस तरह से create command लिखी जाएगी उसी तरह से table का Structure create होगा | एक table create करने के लिए create command नीचे लिखी गई है : -
1import mysql.connector
2con = mysql.connector.connect(
3    host="localhost",
4    उपयोगr="root",
5    password="__",
6    database="school"
7)
8cur = con.cursor()
9
10cur.execute("""
11CREATE TABLE IF NOT EXISTS students (
12    id INT PRIMARY KEY AUTO_INCREMENT,
13    name VARCHAR(50),
14    age INT,
15    class VARCHAR(20)
16)
17""")
18print("Table Created Successfully")
19con.commit()
Code Explanation
CREATE TABLE IF NOT EXISTS students ( = > students नाम की एक Table Create की गई है |
id INT PRIMARY KEY AUTO_INCREMENT = > id नाम का एक attribute Create किया गया , जिसकी value
अपने आप increase होती जाएगी |
name VARCHAR(50) = > name नाम का attribute Create किया गया है जिसमे 50 character तक
ही name store हो सकता है |
class VARCHAR(20) = > class नाम का attribute Create किया गया है , जिसमे 20 character तक का
ही class name store हो सकता है |
print("Table Created Successfully") = > जब आप Python file मे ये code डालकर code को run
करोगे तो print Functions मे लिखा गया message output मे display होगा |
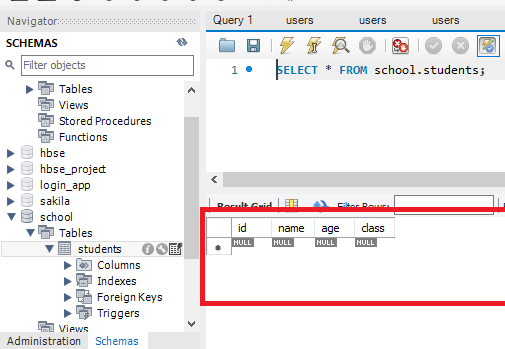
अब mysql workbench मे school नाम के database मे students नाम की table को search करे जैसे ही students नाम की
table को
open करोगे तो एक table Create हुई मिलेगी जैसे :-
2. commit Command
commit command का उपयोग ये बताने के लिए किया जाता है कि बाद मे table के साथ और काम किया जायेगा | python के साथ
commit
command का उपयोग करने के लिए commit command को कुछ ऐसे लिखा जाता है |
con.commit()
मतलब mysql और python के connection को commit करो |
commit command का उपयोग python code के last मे किया जाता है |
3. insert command
आप देख पा रहे होगे की students नाम की table Create हो गयी है , लेकिन table के attributes मे value null है , इसलिए table के attributes मे value store करने के लिए insert command का उपयोग किया जाता है | insert command से table के attribute मे value add करने के लिए insert command का code नीचे दिया गया है |
1import mysql.connector
2con = mysql.connector.connect(
3    host="localhost",
4    उपयोगr="root",
5    password="__",
6    database="school"
7)
8cur = con.cursor()
9
10cur.execute("""
11INSERT INTO students (name, age, class)
12VALUES (%s, %s, %s)
13""", ("Ram", 20, "12th"))
14print("Data Inserted Successfully")
INSERT INTO students (name, age, class) = > students table के (name, age, class)
attributes
मे insert करने को कहा गया है |
VALUES (%s, %s, %s) = > attributes मे values assign करने के लिए %s का उपयोग किया जाता है
|
("Ram", 20, "12th") = > attributes मे values insert की गई है |
code को run करने पर Data Inserted Successfully लिखा आएगा पर workbench table मे insert हुआ नही मिलेगा |
4. select command
select command table मे data को update करने के बाद select command table मे updated data को show करवाती है | यानि table को execute करने के लिए select command का उपयोग किया जाता है इसलिए insert किए हुए data को students table मे लाने के लिए select command का उपयोग किया जाएगा | select command का code नीचे दिया गया है |
1import mysql.connector
2con = mysql.connector.connect(
3    host="localhost",
4    उपयोगr="root",
5    password="__",
6    database="school"
7)
8cur = con.cursor()
9cur.execute("SELECT * FROM students")
10rows = cur.fetchall()
Code Explanation
cur.execute("SELECT * FROM students") = > cursor students table से execute करो |
rows = cur.fetchall() = > fetchall Functions की help से सभी rows को |
अब mysql workbench मे table को execute करने पर table मे data insert हुआ मिलेगा | execute button का photo कुछ
(⚡) ऐसा होता है |
create की गई table मे कुछ और values add कर ले ताकि आगे की commands को समझने मे आसानी हो |
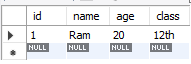
5. update command
table मे stored data मे कुछ update करने के लिए update command का उपयोग किया जाता है | supose करे की आपने name गलत डाल दिया | तो name को update करने के लिए update command का उपयोग करे | update command का code नीचे दिया गया है |
1import mysql.connector
2con = mysql.connector.connect(
3    host="localhost",
4    उपयोगr="root",
5    password="__",
6    database="school"
7)
8cur = con.cursor()
9cur.execute("""
10UPDATE students
11SET name = 'Shyam'
12WHERE id = 1
13""")
14con.commit()
15print("Name Updated Successfully!")
Code Explanation
cur.execute(""" = > cursor execute करो |
UPDATE students = > students table को update मे update करो |
SET name = 'Shyam' = > name attribute मे stored value को Shyam set करो |
WHERE id = 1 = > where name की id 1 है |
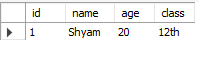
6. Delete Command
किसी row को , value को , attribute etc. को delete करने के लिए Delete command का उपयोग किया जाता है | जैसे : -
1import mysql.connector
2con = mysql.connector.connect(
3    host="localhost",
4    उपयोगr="root",
5    password="__",
6    database="school"
7)
8cur = con.cursor()
9
10cur.execute("DELETE FROM students WHERE id = 2")
11con.commit()
12print("Row Deleted Successfully!")
13cur.execute("SELECT * FROM students")
14print(cur.fetchall())
Code Explanation
cur.execute("DELETE FROM students WHERE id = 2") = > ये statement students table के id 2 के data को delete करता है |
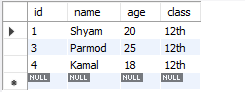
7. Alter command
alter command के उपयोग कोई column row add किए जा सकते है | जैसे :-
1import mysql.connector
2con = mysql.connector.connect(
3    host="localhost",
4    उपयोगr="root",
5    password="__",
6    database="school"
7)
8cur = con.cursor()
9
10dis = "ALTER TABLE studentsss ADD COLUMN district VARCHAR(50) AFTER class"
11cur.execute(dis)
12con.commit()
13print("Column 'district' added ")
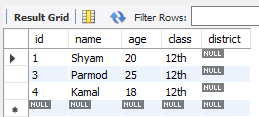
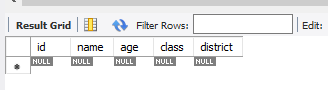
8. Truncate Command
Truncate command के उपयोग से table और columns delete नही होते है लेकिन Truncate command table के सभी rows को delete कर देती है जैसे :-
1import mysql.connector
2con = mysql.connector.connect(
3    host="localhost",
4    उपयोगr="root",
5    password="__",
6    database="school"
7)
8cur = con.cursor()
9
10cur.execute("TRUNCATE TABLE studentsss")
11con.commit()
12print("code Successfully run")
9. Drop Command
Drop command के उपयोग पूरी table drop हो जाती है , यानि delete हो जाती है |
1import mysql.connector
2con = mysql.connector.connect(
3    host="localhost",
4    उपयोगr="root",
5    password="__",
6    database="school"
7)
8cur = con.cursor()
9
10cur.execute("TRUNCATE TABLE studentsss")
11con.commit()
12print("code Successfully run")

Python के साथ MySQL का Purpose
हम python के साथ MySQL का उपयोग क्यों करे हमारा Python के साथ mysql को उपयोग करने का Purpose क्या है | इस को समझ लेना बहुत जरूरी है | ताकि आप अपने Purpose के according mysql skills को और improve कर सके | Python के साथ mysql का उपयोग करने के छ Purpose को नीचे दिए गए है |
1. Python की मदद से कोई भी real-world data MySQL database में save कर सकते हैं।
2. mysql की delete , update , insert जैसी commands के उपयोग से data को perfectly store manage किया जा सकता है
|
3. Database मे Pyton के साथ websites , apps etc. के data को store कर सकते है |
4. डेटा को database में store करके Python ML model में उपयोग करना आसान होता है।
5. banking , gaming companies , hospitals etc. मे mysql का बहुत अधिक उपयोग किया जा रहा है |
Advantages Of Mysql With Python
1. बहुत ही आसानी से mysql को Python से connect किया सकता है |
2. Python के साथ mysql का उपयोग कर पाना सरल है |
3. Python और mysql से किसी website app etc. का Database मे data store किया जा सकता है |
4. Python और mysql को आपस connect करके mac , window , linux सब पर काम किया जा सकता है |
5. mysql मे लाखों rows मे data को store किया जा सकता है |
You have completed This Chapter ! 🎉
Now you can choose any one of the following options to test your knowledge :
Help Center
Users and we all help you together .